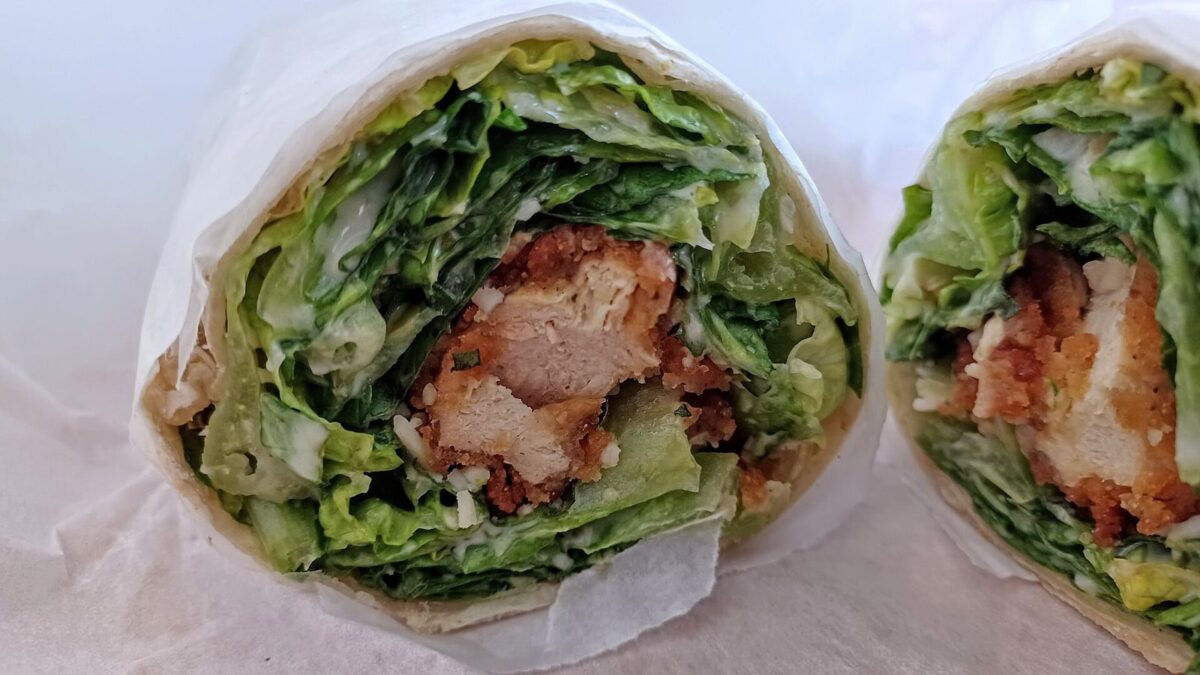
A chicken Caesar wrap fails in one specific way: the tortilla goes translucent and slack near the bottom seam, and the whole thing unrolls in your hand around bite four. That isn’t a lettuce problem or a dressing-quantity problem. It’s a contact problem — wet dressing sitting directly against flour tortilla, given time.
Everything below is built around keeping those two things apart, and around a fold order that makes the wrap hold its own shape instead of relying on your grip.
Prep: 15 mins Cook: 12 mins Rest: 5 mins Makes: 4 wraps
How a Tortilla Actually Fails
Flour tortillas are around 30% water to begin with. Add a thin, oily, watery dressing directly onto that surface and the starch keeps absorbing until the sheet loses tensile strength. In my kitchen the point of no return is roughly 40 minutes at room temperature. In the fridge, wrapped, it’s closer to 5 hours, because the cold slows the migration.
So there are three levers. Make the dressing thicker so less free liquid is available. Put something waterproof between the dressing and the tortilla. And limit how long they sit in contact before eating.
Most recipes only mention the third one, which is why most wraps still fail.
Thickening the Dressing Until It Stops Running
Shop-bought Caesar dressing is formulated to coat leaves, so it’s deliberately pourable. Wrong for a wrap. I take 1/2 cup and stir in 2 tablespoons of thick Greek yogurt plus 1/4 cup of finely grated Parmesan. The Parmesan does most of the work: it’s a dry solid, and it drags the mixture from pourable to spoonable.
The test I use is simple. Put a spoonful on a plate and tilt it to 45 degrees. If it slides, keep adding Parmesan a tablespoon at a time. It should creep, not run.
Then use less than you think. Two tablespoons per wrap, tossed through the chicken rather than smeared on the tortilla. Dressing that lives on the meat can’t touch the bread.
If you want to make dressing from scratch, or you’ve been told anchovies and raw egg are optional, I went through all of that separately in the Caesar salad write-up. Short version for here: a thicker emulsion is a better wrap dressing, and that’s the only property you need to optimise for.
Ingredients
- 2 boneless skinless chicken breasts (about 500g total), or 3 cups shredded rotisserie chicken.
- 1 tablespoon olive oil, 1/2 teaspoon garlic powder, 1/2 teaspoon salt, 1/4 teaspoon black pepper.
- 1/2 cup Caesar dressing, plus 2 tablespoons thick Greek yogurt to stiffen it.
- 3/4 cup finely grated Parmesan — 1/4 cup goes into the dressing, the rest is scattered inside.
- 4 large flour tortillas, 25cm / 10 inch. Smaller than that and the fold won’t overlap enough to seal.
- 1 head romaine: keep 8 whole outer leaves intact for the barrier, chop the rest.
- 1/2 cup croutons, crushed to roughly lentil size.
- 1 tablespoon lemon juice.
Instructions
- Butterfly each chicken breast horizontally so you have four flat pieces of even thickness, about 1.5cm. Rub with the oil, garlic powder, salt and pepper.
- Cook in a hot skillet over medium-high, 4 to 5 minutes on the first side and 3 on the second, until a thermometer in the thickest part reads 74°C (165°F). Pull it there, not later.
- Rest the chicken 5 minutes on a board, then slice across the grain into 1cm strips.
- Stir the yogurt and 1/4 cup of Parmesan into the Caesar dressing until it holds its shape on a tilted spoon. Toss the sliced chicken through it with the lemon juice.
- Warm each tortilla in a dry pan over medium heat, roughly 20 seconds a side, until it’s flexible and steams slightly. Stack them under a clean tea towel.
- Lay a warm tortilla flat. Place 2 whole romaine leaves down the centre, overlapping, cupped side up. This is the barrier layer and it goes down first, before anything wet.
- Spoon the dressed chicken into the cup of the leaves. Add chopped romaine, the remaining Parmesan, and the crushed croutons on top. Leave a clear 5cm border at the bottom and 4cm at each side.
- Fold the bottom edge up over the filling and pull it back towards yourself to compress the pile. Then fold both sides in over that flap. Then roll forward, keeping tension, to the far edge.
- Roll the finished wrap tightly in parchment or foil and leave it seam-side down for 5 minutes. Slice on the diagonal through the paper.
Why the Romaine Barrier Works Better Than a Cheese Slice
A whole romaine leaf has a waxy cuticle on its outer surface. Water beads on it. Lay two leaves cupped-side-up and you’ve built a shallow waterproof trough for the wet filling to sit in, never touching flour.
People suggest a cheese slice for the same job. It works, but it melts against a warm tortilla and glues the layers into one sheet that tears when you bite. The lettuce stays separate and adds crunch.
Use the outer leaves, not the pale hearts. Hearts are too short and too curved to lie flat.
Chicken That Isn’t Chalky
Chicken breast goes from juicy to dry over a range of about 6 degrees. At 74°C it’s safe and still holds moisture. By 80°C the muscle fibres have contracted enough to squeeze most of it out, and no dressing rescues that texture.
Butterflying is the fix that costs nothing. A whole breast is 4cm at the head and 1.5cm at the tail, so the thin end is at 85°C by the time the thick end is safe. Two flat pieces of even thickness cook in the same span of time.
I stopped guessing years ago and just use an instant-read thermometer. It cost about the same as two takeaway lunches and it ended the argument permanently.
Rotisserie chicken is a legitimate shortcut and I use it most weeks. Pull the meat while the bird is still warm; the thigh meat especially seizes and tightens once it’s fridge-cold, and it’s noticeably harder to shred cleanly.
Twenty Seconds of Heat, Not Two Minutes
A cold tortilla cracks along the fold because the starch is set and brittle. Heat softens it and lets it bend without splitting.
But there’s a ceiling. Past about 45 seconds a side in a dry pan, the surface dries out, goes stiff and crisp, and cracks worse than it did cold. You want it warm and floppy, not toasted.
Microwave works too: stack four with a damp paper towel between and give them 30 seconds. The dry pan tastes slightly better from the light scorching.
One thing worth doing: assemble on the warm tortilla straight away. Once it cools back down it stiffens again within a couple of minutes, and you’re back where you started.
The Fold Order, and Why Bottom Comes First
Bottom flap, then sides, then roll. That order matters.
Folding the bottom up first and dragging it back towards you compresses the filling into a tight cylinder before anything else is committed. If you fold the sides first, the filling stays loose and spreads sideways as you roll, and the wrap ends up fat in the middle and empty at the ends.
The compression pull is the step nobody writes down. Fold up, then tug back. You’ll feel the filling gather.
Leave the far 5cm of tortilla bare. That dry edge is what seals against the outside of the roll. Filling that reaches the edge means the seam never closes and the wrap opens on the plate.
The five-minute paper rest
Wrap it tight in parchment and leave it seam-side down for five minutes before cutting. The tortilla relaxes into its new shape and the seam sets. Cut it immediately and it springs back open; give it five and it holds.
This is the single change that made the biggest difference to mine, and it costs nothing but patience.
Slice on the diagonal through the paper rather than unwrapping first. The paper supports the wrap while the knife goes through, and you can peel it back as you eat.
Making It the Night Before
An assembled wrap survives a night in the fridge if you do three things: keep the croutons out entirely, use the romaine barrier, and wrap tightly in foil rather than cling film so no air reaches the tortilla.
Add the croutons in the morning through the open end, or carry them in a small bag. Croutons left in overnight turn to wet bread paste. There’s no saving them.
| Component | Fridge life, stored separately |
|---|---|
| Cooked sliced chicken | 3 days |
| Thickened Caesar dressing | 4 days |
| Chopped romaine, in a dry container | 2 days |
| Fully assembled wrap, foil, no croutons | Overnight only |
If you’re cooking chicken specifically for the week, roast a whole bird instead. Herb roast chicken gives you enough for four wraps plus dinner, and the thigh meat makes a better wrap than breast does — more forgiving, and it doesn’t go chalky when it’s cold. The same batch of chicken also does cheesy chicken quesadillas on the day the tortillas start to dry out, and any leftover romaine belongs in a Greek salad before it wilts.